
 We, as Homo sapiens, are toolmakers. This capability is one of the primary separators of our species from all of the others on the planet. We find a problem, a repeated action, something that annoys us to perform, and sooner or later, we start making devices, gadgets, and tools to make the task easier or go away entirely. Even with software, probably one of the most powerful tools we have ever created, it is still not enough to leave it as it is. We would like tools to make even software more efficient.
Hence, with Excel, there are tasks that just take too much fuss. Over the years of using this terrific spreadsheet tool we have created a number of pieces of additional functionality to automate some of those annoying things that just seem to take too long, even with Excel.
For this article, we are going to take a departure from the more formal exploration of technical project management and introduce some Excel utilities that we find particularly useful. They are a set of 20 utility macros that we use all the time. They help to cut down on key strokes, scrolling, and other laborious time consuming chores on using Excel for project management. The article has a brief discussion of each utility, covering how you might use it in your work day, followed by instructions for installing and using the code. You can find the free download at the Utility Excel Macros for Project Managers page.
Excel VBA Utility Routines
There are twenty routines exposed in the code. There are also a number of utility functions that are used by the exposed routines to perform various support services. If you are interested in using these utility functions in your own code see the comments for information on how they work and what arguments to pass to them.
Each of the descriptions below will give you the name of the procedure or function, what the code actually does, and the shortcut keys that are used if you install the code as described below.
ClearHighlightSet
Ctrl+Shift+C
Sets the highlight for the selected cells to no fill and the font color to “Automatic” (black).
DeleteRow
Ctrl+Shift+D
Deletes entire rows for the selected cells. If you have a selection that crosses three rows then the macro will delete the entirety of the three rows. The action cannot be undone so you need to be careful using this procedure.
FindMax
Ctrl+Shift+X
Finds the first instance of the largest value in the selection and sets the selection to that single cell. The selection may be multiple rows and/or columns and the macro will function correctly.
FindMin
Ctrl+Shift+I
The macro is similar to FindMax except that it sets a single cell selection to the first instance of the minimum value instead of the maximum.
GreenHighlightSet
Ctrl+Shift+G
Sets the highlight color of the current selection to green.
GreyHighlightSet
Ctrl+Shift+M
Sets the highlight color of the currently selected cells to a middle-light grey.
MakeLower
Ctrl+Shift+L
Sets the case of characters in the active cell to lower case. Note the macro affects the single active cell only and not the entire current selection.
MakeUpper
Ctrl+Shift+U
Similar to MakeLower except that it sets the characters in the active cell to all uppercase.
PasteSpecialValues
Ctrl+Shift+V
Pastes values on the clipboard to the current worksheet starting at the active cell. If the clipboard was loaded with values from an application other than excel it will paste the text only if possible. If the clipboard is loaded with something that cannot be converted to text (e.g. a picture) the macro will display an error telling you about it. Additionally, this macro, like the Excel paste special feature, does not work with selections that are cut from a worksheet to the clipboard, only copied.
PasteSpecialWidthFormatValues
Ctrl+Shift+A
Performs a paste special of values, column widths, and formats from the clipboard. If the source for the clipboard is not Excel it will function the same as the PasteSpecialValues macro.
PasteValuesTransposed
Ctrl+Shift+T
Pastes the values on the clipboard transposed, that is, values in columns are pasted in rows and vice versa. For example, if the copied selection was three rows by two columns, the PasteValuesTransposed action will paste the selection as two rows and three columns. If the source for the clipboard is not Excel it will function the same as the PasteSpecialValues macro.
PrintSelection
Ctrl+Shift+P
Prints the current selection to the default printer.
RedHighlightSet
Ctrl+Shift+R
Sets the highlight color of the currently selected cells to red.
RowHeightReset
Ctrl+Shift+H
Sets the Wrap Text property for all the cells in the current selection to true and resets the row height.
SelectionParseToStringClip
Ctrl+Shift+S
Copies the values from the current selection to a list delimited by the pipe ‘|’ character. For example, if your selection looks like this:+
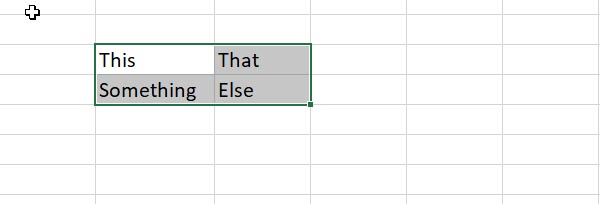
Then the value placed on the clipboard will be “This|That|Something|Else”.
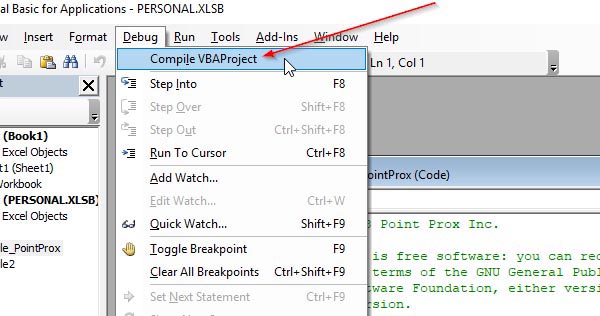
If you prefer a different delimiter then open the code, change the ‘|’ to whatever you want and then recompile the macros from the Debug menu’s “Compile VBA Project” command.
SelectToLastDataColumn
Ctrl+Shift+N
Create a selection that is as tall as the current selection from the first column to the last column that contains data on the worksheet. The macro ignores cells with blank data.
SelectToLastDataRow
Ctrl+Shift+W
Creates a selection the from the first row to the last row that contains data for the column that contains the active cell. The advantage over using Cntl+down arrow is that it ignores blank rows in the column.
SetIncrementValue
Ctrl+Shift+Q
For the column with that contains the active cell, the macro sets the first non-blank cell after the last data cell to the next increment value for the column. If the column contains a date, the result will be the latest date plus one day. If it contains numbers, it will me the maximum plus one.
YellowHighlightSet
Ctrl+Shift+Y
Sets the highlight color of the currently selected cells to yellow.
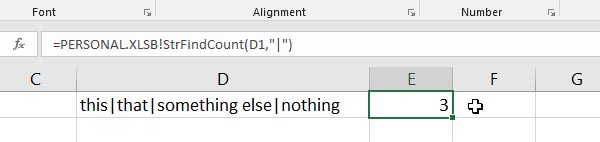
StrFindCount
Worksheet function
This macro is a worksheet function that counts the occurrences of a string within the referenced cell. To use the function in your worksheet you will need to prefix the function name with the name of your global workbook. This is usually “PERSONAL.XLSB”. For example, in the illustration below the function finds three occurrences of the pipe character in the cell passed to the function call.
Installing the Utility Macros
All but one of these macros are intended to provide a quick useful task from the keyboard. As such they are designed to be run from hotkeys, that is, you will type a set of characters to run the associated macro. If you follow the installation instructions, below, you will have nineteen utilities with the keyboard shortcuts as noted above, one worksheet function, and with the code compiled and ready to run. If you already have macros set to run from shortcuts you might want to install these manually and then set whatever shortcuts you would prefer.
Note that the code works with every version from Excel 2010 to the latest version of Excel 365 (as of the date of publication). If you find that it works with earlier versions, please send us a note.
The software is published under the GNU General Public License which means the software is Open Source and you can use it for free, along with some other rights. There is information about the license along with contact information in the installation archive. Feel free to share this with your friends and colleagues, but do us a favor and keep the copyright notice at the top of the code file.
To load the PointProx utility macros into Excel perform the following steps:
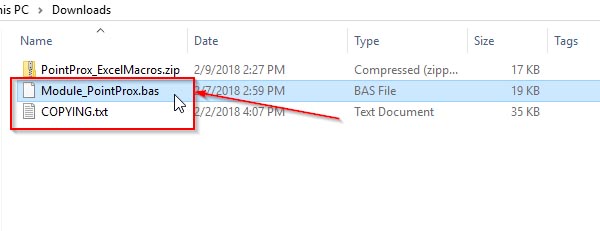
- Download the archive associated with this article. The Excel utility macros can be found on the PointProx.com file repository in the Utility Excel Macros for Project Managers page.
- Unpack the archive. There are two files in the archive: Module_PointProx.bas (the install file) and COPYING.txt (the GPL license).
- Open Excel and create a new worksheet.
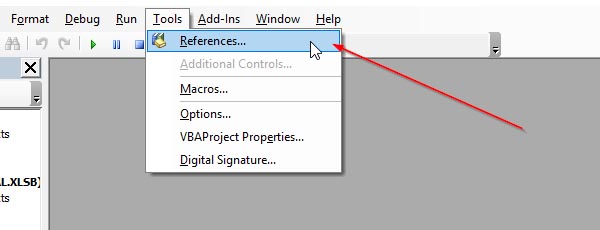
- Type Alt+F11 to open the Visual Basic for Applications editor.
- Select the References… command from the Tools menu.
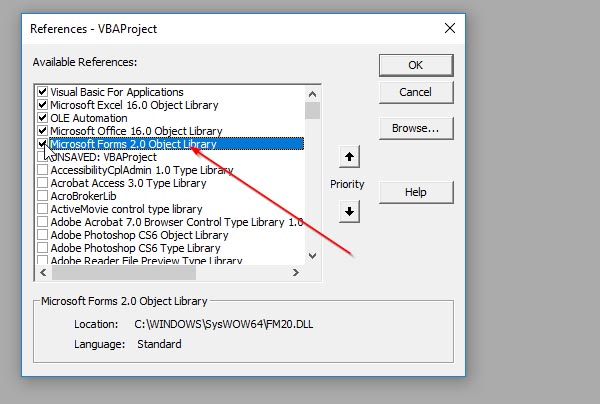
- Excel opens References – VBAProject dialog box. Check the checkbox next to the entry for Microsoft Forms 2.0 Object Library. If it is already checked then leave it alone. If you cannot locate the file click on the Browse button, navigate to c:\\Windows\System32\, locate the file named FM20.DLL, click Open, and then click on the Microsoft Forms 2.0 Object Library checkbox. If none of the above works for you check with your system administrator.
- Click the OK button to close the References – VBAProject dialog box.
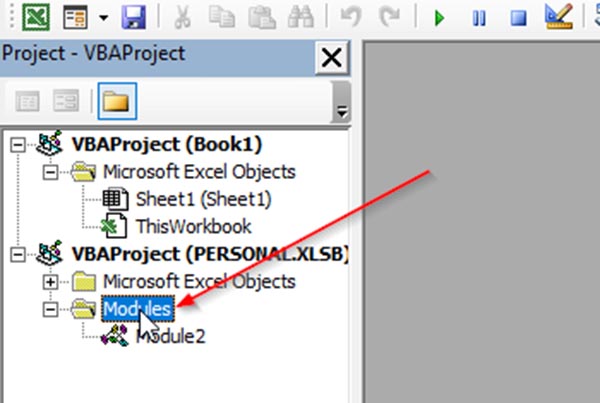
- Locate the VBAProject entry for the PERSONAL.XLSB in the project view section in the upper left of the VBA editor window.
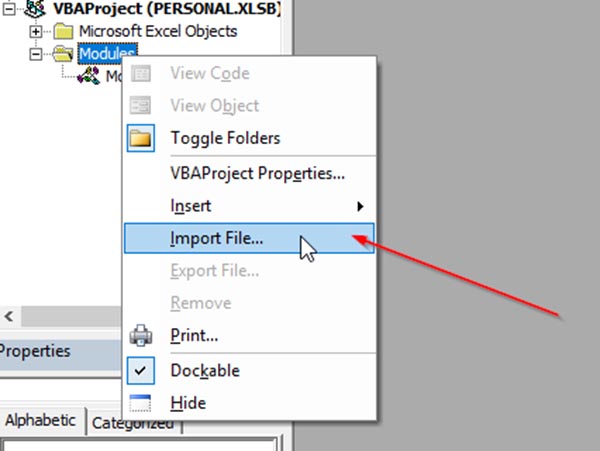
- Right mouse click on the Modules folder icon and select Import File… command.
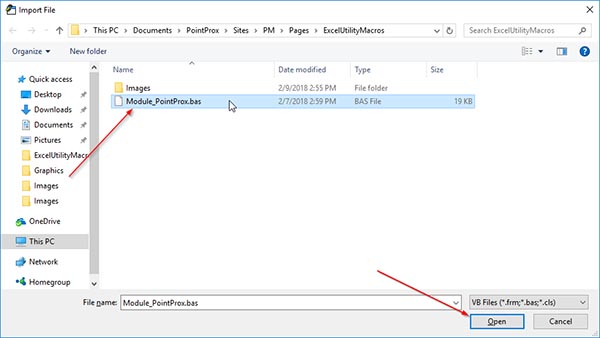
- Excel will open a standard Open File dialog box. Navigate to where you unpacked the archive, select the Module_PointProx.bas file, and click the Open button.
- That should be it. Go to the worksheet and try some of the macros just to make sure everything is ok. If they are not working, go back to the VBA editor and select the Compile VBA Project from the Debug menu. If it complains about compilation errors check that you did steps 5 – 7 correctly and try to compile again.
- If the utility macros still do not work check with your local Excel expert or the IT support team as there may be something that is not standard with your setup.
Summary
Not a whole lot to summarize, but as we learned at school, always have a summary, so here it is. The utility macros provide some additional capabilities that will make your work in Excel a little easier. Creating utilities in Excel is not too hard even if you do not know to write VBA code. If you find that you are performing a task repeatedly you can use the macro recorder to write the code for you and assign a keyboard shortcut. If you are really interested in learning how to write your own macros, see references below for some books that might be helpful in your quest.
References
Excel 2016 VBA and Macros
Excel 2016 Power Programming with VBA
Excel Macros & VBA For Business Users – A Beginners Guide

Leave a Reply